

Gap Analysis With ATT&CK: Fix Your Posture, Young Man!

Early adopters certainly focused on using ATT&CK for glamorous use cases like Threat Intelligence and Adversary Emulation. Conducting gap analysis with ATT&CK to prioritize engineering efforts is a high-return effort for you and your organization. It's my favorite of the use cases because it can help any organization! Before the availability of CTI for everyone, many gap assessments conducted by organizations without dedicated threat intelligence teams. The only means available were often based on notional system architectures driven by market trends or vendor pressures. You may have experienced this yourselves - and you may have mountains of shelf-ware purchased in response to the latest fad. By leveraging CTI from frameworks like ATT&CK, you can now ensure that every defensive measure you take provides actual value in countering the threat actors and techniques that are likely to target you.

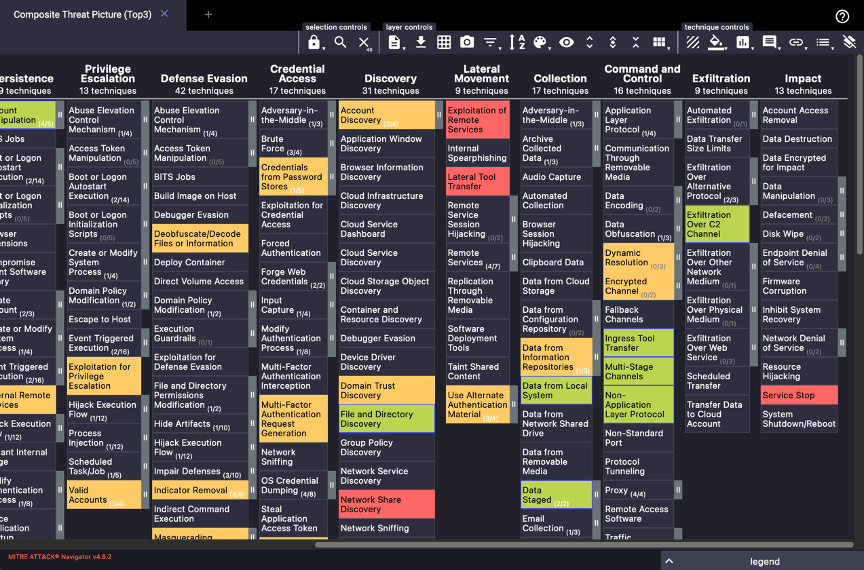
The process of conducting these gap analyses vary from organization to organization, but a great place to start is with MITRE’s own ATT&CK Navigator. You can self-host it for internal (and even air-gapped) use. I tend to stick with a publicly open and shared instance for training and demonstrations. A sample threat picture is shown below.
Performing Gap Analysis
If you and your team prefer, you can even use spreadsheets to accomplish similar results. Regardless of the tooling used, you can perform gap analysis with ATT&CK in three easy steps:
1) Build a Threat Picture
Why does this matter? Ever seen Monsters Inc.? Every child had a monster that was most scary to them - that could produce the sorts of fear and generate power unlike any other. If you put a child in front of someone else's monster, the response was not ideal. Well threat pictures are the same thing - respond to YOUR most feared monster, not someone else's. The focused response saves you time and money. How can we compile and score a threat picture representing the techniques that you expect will be attempted against your environment?
High-level CTI from peers or ISACs inform this, or you may choose another source. You can even derive the picture from threat assessments, or lessons learned from prior attacks. We'll discuss more here in future posts.
You may begin with a small set (3-5) top threat actors and score them based on likelihood or concern. Once you've done so, combine them using ATT&CK Navigator (or other tool) to offer a composite view. Again - what scares us? And if it is multiple monsters, how do we rank those?
2) Build an ATT&CK Coverage Matrix
Ok, so you've tackled the threat picture. Now, let's focus on how prepared we are. In this step, take stock of what tools and configurations are present in the environment. We'll cover some tools like D3TTECT and vendor matrices that might help later, but here is the gist:
Don’t forget to account for built-in mitigations and detection schemes. Much of ATT&CK’s detection and mitigation content focuses on hardening the operating systems and platforms you are protecting.
You want to build matrices for each of these areas of the architecture (user devices, servers, LAN, WAN, DMZ, etc.). Then add in coverage matrices for your security solutions that offer visibility and detection value.
Build a composite view built using ATT&CK Navigator or a spreadsheet to provide a holistic, contextual representation of where the architecture is.
3) Compare the two
Now, using ATT&CK Navigator or your tool of choice, draw a comparison between the Threat Picture and the Coverage Matrix to expose the gaps apparent in an architecture. Those results shine a light on engineering priorities for your team to tackle. Again, we're assuming you had accurate information and your solutions are properly configured.
I have a relatively quick (by my standards, anyway) 15 minute demo on how to do this with a quick use of Navigator. Check it out, let me know if you have any issues with it!
Trust but verify!
When you perform gap analysis with ATT&CK to prioritize engineering efforts, any process assumes that all data accurately represents the current state. You can probably guess that assumptions here can be costly. To ensure that the coverage represented is accurate, you should run periodic tests. These in turn validate that an expected detection did indeed fire. More importantly you can verify that they provide the right alerting and context to you and your teammates to spur appropriate action. Processes are also critical to getting the most out of CTI tools like ATT&CK in improving Threat Hunting. Whenever possible, stress test the entire system (people, process, and technology). These tests uncover gaps and ensure that your organization is best protected. Why wait for the adversaries to do that?